 |
| Buckthorn Spoon |
Showing posts with label Green Woodworking. Show all posts
Showing posts with label Green Woodworking. Show all posts
Wednesday, March 14, 2012
A New Spoon


Monday, November 22, 2010
Guest Post from Wood Trekker: A Cheap Alternative to the Gransfors Bruks Small Forest Axe
Today's guest post is from Ross over at Wood Trekker blog. Ross' blog is currently in my top five favorite blogs to read and I was very excited when I asked him if he would be interested in a guest post and he came back with this. This post is very timely because I hope to be doing a post about my own personal axe (which is not a Gransfors Bruks). Enjoy!
We are all familiar with the Gransfors Bruks Small Forest Axe. It is arguably one of the most popular bushcraft tools, and is the axe of choice for many. One of the reasons why it has become so popular is that it is very compact and easy to carry. It has a head weight of 1.5lb and a handle length of about 20 inches. The big down side of the Gransfors Bruks Small Forest Axe is the price tag. It costs well over $100.00. For many it is worth the price, but not everyone can afford it.
That is why I decided to try to find a lower cost alternative, which would provide a reasonable level of performance. After a lot of searching, I’ve reached the conclusion that there is no production axe other than the Wetterling ones, now also owned by Gransfurs Bruks which come close to the same specifications.
Recently I looked at the Collins Hunter’s Axe, but the quality was too low, and I found the 18 inch handle to be too short. For me, a small axe must have a handle of at least 20 inches. Snow and Nealley makes an axe with an 18 inch handle as well, but since I’ve found that length handle to be too short, I will not be testing it. Besides, the Snow and Nealley is not cheap at all.
Since I was not able to find a low cost production alternative to the Small Forest Axe, I decided to look at old axe heads and see if a particular type can be refurbished. Unfortunately, most old axes are of the full axe type variety, with a head of over 3.5lb. There certainly aren’t enough 1.5lb heads out there for people to start refurbishing them.
I did however luck out during one of my hatchet tests. I tested the Northern Tool 24oz Camp Axe as a hatchet, but noticed that the head was 1.5lb. That was too heavy for a hatchet, but the quality of the head seemed good. That is why I decided to try to do some work to one of them and see if I can easily make a Small Forest Axe substitute from it. I know that not everyone has access to a workshop, expensive tools or specialized skills, so I wanted to get it done with just basic tools.
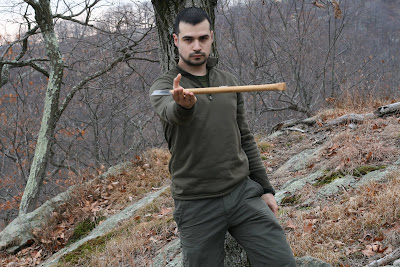
After some work, the finished product was this:

Specifications:
Manufacturer: Head by Northern Tool + Equipment, Handle by Gransfors Bruks
Axe Head Weights: 1.5 lb
Axe Length: 20 inches
Axe Head Material: Unknown carbon steel
Handle Material: American hickory
Cost: $23.00

Here is how I made it:
I took a Northern Tool 24oz Camp Axe. It cost me $10.00. I used a drill and a chisel to remove the head from the handle. It was very well glued so it took me some time to remove. I then used some sandpaper to remove all of the paint from the head.
One of the things that I noted during my review of the Northern Tool 24oz Camp Axe is that I thought the convex of the cutting edge itself was a bit too thick for my liking. The cheeks of the axe were the right thickness and the head overall had the right proportions, but the last 3/16 of an inch before the cutting edge was a bit thick. I’m sure that for many that thickness would be fine because it makes the edge more durable, but for the high performance axe that I wanted, it was too thick.
I remedied the situation by filing it down a bit. I used a 200 grit 8 inch file to do the job. It took me about 15 minutes of work. I would strongly recommend getting a file if you will be doing any work with cheap axes. It makes the sharpening process much faster, and you can pick one up for about $3.00. I then used a set of sharpening stones to get it sharp enough to cut paper. The thickness with which I ended up was very similar to that of the Gransfors Bruks Wildlife Hatchet, and was noticeably thinner than the Gransfors Bruks Small Forest Axe (right).

Now that the head was ready, it was time to find a handle. I looked high and low for a good 20 inch handle, but could not find one. I eventually decided to just buy a Gransfors Brucks Small Forest Axe handle. They are very hard to find in the US. I found only one store (Country Knives) that carried them, and they were selling them for about $45.00, way too much for the intended goal. In the end, I ended up buying it from a UK site for $13.00.
I bought my handle here. They seem to however be quickly running out of stock. Some other sites where you can find a Gransfors Bruks handle are here, here, and here. Keep in mind that the price will fluctuate depending on the exchange rate. When you are shipping it from over seas make sure to use airmail rather than UPS. If you use UPS, it will cost you over $30.00. It is a waste of money. You may be able to find 20 inch handles by other manufacturers which I am sure will work fine. One good source can be found here.
Now came the time consuming part. I spend about two hours sanding and filing the handle so it would fit well in the axe head. I didn’t use any epoxy on the head itself, but I did use some to secure the wedge into the handle.
When the epoxy was dry, I took the axe into the woods for some testing. My hope was that I had made an axe that would not fall too far behind the Gransfors Bruks Small Forest Axe.

The new axe is a bit more likely to stick to the wood than the Gransfors Bruks Small Forest Axe because it has more of a wedge shape, but I did a lot of chopping with it, and it was not a noticeable problem.
The balance of the axe is as good or better than the Gransors Bruks Small Forest Axe.
Other than the drill and chisel I used to remove the head from the old handle, these are all the tools I used to put together this axe: Gorilla glue epoxy, sandpaper, a 200 grit unidirectional grind 8 inch file, a hammer, and a set of sharpening stones.

I made a cheap sheath for it from some canvas material I had around.

The total cost was $23.00 and took me probably about five hours of work time to put together. This is not something that I do all the time, so my skill level is not high, nor did I use any special tools and equipment. The result is a $23.00 axe that can outperform the Gransfors Bruks Small Forest Axe. Try it for yourself and see.
We are all familiar with the Gransfors Bruks Small Forest Axe. It is arguably one of the most popular bushcraft tools, and is the axe of choice for many. One of the reasons why it has become so popular is that it is very compact and easy to carry. It has a head weight of 1.5lb and a handle length of about 20 inches. The big down side of the Gransfors Bruks Small Forest Axe is the price tag. It costs well over $100.00. For many it is worth the price, but not everyone can afford it.
That is why I decided to try to find a lower cost alternative, which would provide a reasonable level of performance. After a lot of searching, I’ve reached the conclusion that there is no production axe other than the Wetterling ones, now also owned by Gransfurs Bruks which come close to the same specifications.
Recently I looked at the Collins Hunter’s Axe, but the quality was too low, and I found the 18 inch handle to be too short. For me, a small axe must have a handle of at least 20 inches. Snow and Nealley makes an axe with an 18 inch handle as well, but since I’ve found that length handle to be too short, I will not be testing it. Besides, the Snow and Nealley is not cheap at all.
Since I was not able to find a low cost production alternative to the Small Forest Axe, I decided to look at old axe heads and see if a particular type can be refurbished. Unfortunately, most old axes are of the full axe type variety, with a head of over 3.5lb. There certainly aren’t enough 1.5lb heads out there for people to start refurbishing them.
I did however luck out during one of my hatchet tests. I tested the Northern Tool 24oz Camp Axe as a hatchet, but noticed that the head was 1.5lb. That was too heavy for a hatchet, but the quality of the head seemed good. That is why I decided to try to do some work to one of them and see if I can easily make a Small Forest Axe substitute from it. I know that not everyone has access to a workshop, expensive tools or specialized skills, so I wanted to get it done with just basic tools.
After some work, the finished product was this:

Specifications:
Manufacturer: Head by Northern Tool + Equipment, Handle by Gransfors Bruks
Axe Head Weights: 1.5 lb
Axe Length: 20 inches
Axe Head Material: Unknown carbon steel
Handle Material: American hickory
Cost: $23.00

Here is how I made it:
I took a Northern Tool 24oz Camp Axe. It cost me $10.00. I used a drill and a chisel to remove the head from the handle. It was very well glued so it took me some time to remove. I then used some sandpaper to remove all of the paint from the head.
One of the things that I noted during my review of the Northern Tool 24oz Camp Axe is that I thought the convex of the cutting edge itself was a bit too thick for my liking. The cheeks of the axe were the right thickness and the head overall had the right proportions, but the last 3/16 of an inch before the cutting edge was a bit thick. I’m sure that for many that thickness would be fine because it makes the edge more durable, but for the high performance axe that I wanted, it was too thick.
I remedied the situation by filing it down a bit. I used a 200 grit 8 inch file to do the job. It took me about 15 minutes of work. I would strongly recommend getting a file if you will be doing any work with cheap axes. It makes the sharpening process much faster, and you can pick one up for about $3.00. I then used a set of sharpening stones to get it sharp enough to cut paper. The thickness with which I ended up was very similar to that of the Gransfors Bruks Wildlife Hatchet, and was noticeably thinner than the Gransfors Bruks Small Forest Axe (right).

Now that the head was ready, it was time to find a handle. I looked high and low for a good 20 inch handle, but could not find one. I eventually decided to just buy a Gransfors Brucks Small Forest Axe handle. They are very hard to find in the US. I found only one store (Country Knives) that carried them, and they were selling them for about $45.00, way too much for the intended goal. In the end, I ended up buying it from a UK site for $13.00.
I bought my handle here. They seem to however be quickly running out of stock. Some other sites where you can find a Gransfors Bruks handle are here, here, and here. Keep in mind that the price will fluctuate depending on the exchange rate. When you are shipping it from over seas make sure to use airmail rather than UPS. If you use UPS, it will cost you over $30.00. It is a waste of money. You may be able to find 20 inch handles by other manufacturers which I am sure will work fine. One good source can be found here.
Now came the time consuming part. I spend about two hours sanding and filing the handle so it would fit well in the axe head. I didn’t use any epoxy on the head itself, but I did use some to secure the wedge into the handle.
When the epoxy was dry, I took the axe into the woods for some testing. My hope was that I had made an axe that would not fall too far behind the Gransfors Bruks Small Forest Axe.

The result was shocking. The axe I made noticeably outperformed the Small Forest Axe. So much so, that I decided to go back to a location where I had done some testing with the Small Forest Axe on a piece of 3.5 inch hickory. The last time I tested it, it took me 60 seconds to chop through it with the Small Forest axe. It took me 45 seconds to go through it with the new axe.
I believe the added performance comes from the thinner grind of the new axe. It is still convexed, but comes very close to the grind of a competition axe. Of course, my worry was that because the edge was thinner, after being used in hard wood, it would dull very quickly. When I came home, I tested it on a piece of paper, and it had no problem cutting through it. That was after going through an 8 inch piece of oak.
I believe the added performance comes from the thinner grind of the new axe. It is still convexed, but comes very close to the grind of a competition axe. Of course, my worry was that because the edge was thinner, after being used in hard wood, it would dull very quickly. When I came home, I tested it on a piece of paper, and it had no problem cutting through it. That was after going through an 8 inch piece of oak.
The new axe is a bit more likely to stick to the wood than the Gransfors Bruks Small Forest Axe because it has more of a wedge shape, but I did a lot of chopping with it, and it was not a noticeable problem.
The balance of the axe is as good or better than the Gransors Bruks Small Forest Axe.

Other than the drill and chisel I used to remove the head from the old handle, these are all the tools I used to put together this axe: Gorilla glue epoxy, sandpaper, a 200 grit unidirectional grind 8 inch file, a hammer, and a set of sharpening stones.

I made a cheap sheath for it from some canvas material I had around.

The total cost was $23.00 and took me probably about five hours of work time to put together. This is not something that I do all the time, so my skill level is not high, nor did I use any special tools and equipment. The result is a $23.00 axe that can outperform the Gransfors Bruks Small Forest Axe. Try it for yourself and see.
Saturday, January 30, 2010
Urban Bushcrafters?
Fairly recently the demographics of the world made a sad shift. Whereas in the past a majority of the world's populations lived and worked on farms or in rural communities, now a majority of people live in major cities. People are also growing increasingly disconnected from the natural world both in major cities and rural areas, not having any real concept of where their food, clothing and building materials come from, let alone what resource they are made of. I think that bushcrafting can help to alleviate some of the disconnect from the natural world.
Well, since a lot of people live in urban areas and those that live in rural area often live on small acreages how are they supposed to get out and practice bushcraft skills? The beauty of bushcraft is that you don't need boundless acres of untrammeled wilderness to hone your skills or to gather materials practicing. Above all else a bushcrafter is resourceful and the limits set by living in an non-wilderness setting should only heighten your skills because of the disadvantages you must overcome.
So where can you safely practice bushcraft without fear of breaking the law? It depends on what aspect of bushcraft you are planning to practice at any given time. When my oldest was still just a baby my wife was working nights so I got to spend a lot of time with her close to home. When she would go to bed it was often still light outside so I would grab the baby monitor, my puukko, my hoof knife, and some green Basswood (Tilia americana) and head out to the picnic table in the backyard and BINGO! I was bushcrafting. Later in the year as the sun set earlier I would head into the basement to my little shop area tucked away under the stairs (which I affectionately deemed "Bushcraft Corner") and work on projects like my beeswax stove. The point I'm trying to make is you can practice bushcraft where you are. You don't need "wilderness", after all wilderness is just as much a state of mind as it is a blank spot on a map.
So you say you don't have a lot of resources in your yard to gather for projects like green woodworking, or making a DIY bucksaw? Thats not a problem so long as you have occasional access to some public areas. At this point you need to do a little home work. The most lenient places to practice bushcraft are National and State Forests. Both generally allow you to camp where ever you like so long as you move you camp every 14 days. Often times you can have fire outside of designated rings too, but be smart, check the local regulations before you try it, also be sure to keep your fires small and do you damnedest to hide your fire scars. In most public areas that allow campfires you can collect wood that is dead AND down . I stress that the wood should be laying down because dead standing trees are really, REALLY important habitat called snags. While you are collecting fire wood set aside a couple of pieces of wood to try your hand at carving.
That being said, carving dried or cured wood is not nearly as easy as carving green wood and therein lies a quandary. If you don't own a stand of timber, or if you don't have a friend or family member that does how are you supposed to get green wood to work? The best suggestion I can give you to educate yourself. Find out what woody plants in your area are invasive and suitable for carving. Learn how to identify the plant and then hightail it to the nearest land management office. Ask them if they have any of the offending plant in the areas they manage, and if so ask if you can volunteer to cut some of them out. In the Upper Midwest Common buckthorn (Rhamnus cathartica L.) is an invasive that grows in abundance and carves up b-e-a-u-t-i-f-u-l-l-y. While you're asking about volunteering and massacring buckthorn, find out if they need any trails cleared, or saplings cut back from the trail edge- another great source for materials.
Also be sure to let the land manager know that you plan on taking small amounts of wood home to do projects like carve spoons, etc. and reassure them they will not be sold. It also wouldn't hurt to whip up a spoon or two for the land manager and their staff, as a show of good faith.
I hope that this post encourages someone to get out and try some of my suggestions especially if you live in a town or city. If you don't neither will your children or grandchildren and THAT is a chilling prospect.
So you say you don't have a lot of resources in your yard to gather for projects like green woodworking, or making a DIY bucksaw? Thats not a problem so long as you have occasional access to some public areas. At this point you need to do a little home work. The most lenient places to practice bushcraft are National and State Forests. Both generally allow you to camp where ever you like so long as you move you camp every 14 days. Often times you can have fire outside of designated rings too, but be smart, check the local regulations before you try it, also be sure to keep your fires small and do you damnedest to hide your fire scars. In most public areas that allow campfires you can collect wood that is dead AND down . I stress that the wood should be laying down because dead standing trees are really, REALLY important habitat called snags. While you are collecting fire wood set aside a couple of pieces of wood to try your hand at carving.
That being said, carving dried or cured wood is not nearly as easy as carving green wood and therein lies a quandary. If you don't own a stand of timber, or if you don't have a friend or family member that does how are you supposed to get green wood to work? The best suggestion I can give you to educate yourself. Find out what woody plants in your area are invasive and suitable for carving. Learn how to identify the plant and then hightail it to the nearest land management office. Ask them if they have any of the offending plant in the areas they manage, and if so ask if you can volunteer to cut some of them out. In the Upper Midwest Common buckthorn (Rhamnus cathartica L.) is an invasive that grows in abundance and carves up b-e-a-u-t-i-f-u-l-l-y. While you're asking about volunteering and massacring buckthorn, find out if they need any trails cleared, or saplings cut back from the trail edge- another great source for materials.
Also be sure to let the land manager know that you plan on taking small amounts of wood home to do projects like carve spoons, etc. and reassure them they will not be sold. It also wouldn't hurt to whip up a spoon or two for the land manager and their staff, as a show of good faith.
I hope that this post encourages someone to get out and try some of my suggestions especially if you live in a town or city. If you don't neither will your children or grandchildren and THAT is a chilling prospect.
Saturday, October 4, 2008
First Basket

Here you can see the product of my first basket weaving attempt. The whole project from collecting the materials to the assembly took a little under an hour.
I was on a hike when I came across a tree top down across the trail and I noticed that the top was full of wild grape vines (Vitis riparia) pg.13. As I was removing the tree top from the trail I started to mess around with the grape vine and I noticed the the vines that were the diameter of a pencil WITH shaggy bark were very pliable and could be tied in knots.
I thought to myself "Self, you could make a basket out of these vines". Which I promptly did. The ribs are made from a small Grey dogwood (Cornus racemosa) branch split into sixths.
Tuesday, September 9, 2008
Pot Hook

This is an improvised pot hook that I made a while back. It is held together by placing a small wedge into a carved notch at the center of the two hooked pieces. The hooks are made from ironwood/hophornbeam (Ostrya virginiana) branches, and the wedge is chokecherry (Prunus virginiana).
The next time I make one of these I plan on using a much softer wood. The ironwood/hophornbeam was difficult to carve smoothly, and I think I could make something like basswood (Tilia americana) fit more tightly together. Also the ironwood/hophornbeam checked and warped so badly that the pot hook no longer stays together.
This was a really fun project to work on and helped to improve my dexterity with my knife. Let me know if you have tried anything similar to this, or if I motivate you to try something.
The next time I make one of these I plan on using a much softer wood. The ironwood/hophornbeam was difficult to carve smoothly, and I think I could make something like basswood (Tilia americana) fit more tightly together. Also the ironwood/hophornbeam checked and warped so badly that the pot hook no longer stays together.
This was a really fun project to work on and helped to improve my dexterity with my knife. Let me know if you have tried anything similar to this, or if I motivate you to try something.

Tuesday, August 26, 2008
Wild Plum Adze
 DIY Adze
Here is an adze I cobbled together recently. The blade is a copy of an 18th century British Light Infantry tomahawk. The handle is a Wild plum (Prunus americana) branch that I had to trim from over a trail. I lashed the head on using a nylon cord, but rawhide would have worked better. For being an improvised tool I was impressed with how well it worked.
I was inspired by the journals of Lewis & Clark becase they mentioned that they made most of the tool handels they needed on thier journey to the Pacific from Choke cherry (Prunus virginiana) trees that grew along the Missouri River.
Tuesday, August 12, 2008
Buck Saw
 This is a bucksaw that I put together recently for a improvised equipment class I taught. I had never mad one before this and it worked REALLY well! I tested it out by felling a 6" diameter Ironwood tree/Eastern hophornbeam (Ostrya virginiana) and it worked as well as a store bought model.
The uprights and cross braces are made from Gray dogwoods (Cornus racemosa) . The blade is from a local hardware store and it set me back $2.99. The turnbuckle at the top is jute twine wrapped six times before it was twisted.
Tuesday, August 5, 2008
More Green Woodworking
I was given a Frost spoon knife for Fathers Day. Prior to getting a real spoon knife I had been using a hoof knife usually used to clean horse hooves. The kuksa, bowl, and spoon pictured hear were carved using the hoof knife. The ladel was carved using my new spoon knife.

Kuksa
 Spoon
Spoon
 Bowl
Bowl
Ladel top
Ladel side
I still carry the hoof knife in the field because it packs better than the spoon knife, but the spoon knife make the finishing work much smoother. Stay tuned for some more DIY projects!
Monday, February 18, 2008
Carving my first spoon

Basswood Spoon
This is the first spoon that I have ever made. I made it for my wife tonight while she was at work. I carved it from piece of dry Basswood (Tilia americana) left over from making a bow-drill for a survival class I had taught a while back.
I started by splitting off a section from the large piece of wood that you can see my puukko’s stuck into. I used my larger puukko like a froe with and I used a piece of pine like a mallet to drive it through. Then I used the smaller puukko to rough out the spoons general shape. I carved the depression of the “business end” of the spoon with a hoof knife. I was very pleased with the way that it turned, but more importantly so was my wife!
The finale on the spoons handle is carved in the shape of a morel mushroom. It is a fitting totem because my wife is highly adept at finding the elusive fungus.
This is the first spoon that I have ever made. I made it for my wife tonight while she was at work. I carved it from piece of dry Basswood (Tilia americana) left over from making a bow-drill for a survival class I had taught a while back.
I started by splitting off a section from the large piece of wood that you can see my puukko’s stuck into. I used my larger puukko like a froe with and I used a piece of pine like a mallet to drive it through. Then I used the smaller puukko to rough out the spoons general shape. I carved the depression of the “business end” of the spoon with a hoof knife. I was very pleased with the way that it turned, but more importantly so was my wife!
The finale on the spoons handle is carved in the shape of a morel mushroom. It is a fitting totem because my wife is highly adept at finding the elusive fungus.
Subscribe to:
Posts (Atom)